Channels
How to create an Email Channel
An Email Channel lets customers write to a mailbox and get an answer back by email. The bot reads the mailbox, writes a reply, and sends it from your address.
Updated October 4, 2026. Applies to the BotableX Staff Portal. For tenant admins.
An Email Channel lets customers write to a mailbox and get an answer back by email. The bot reads the mailbox, writes a reply, and sends it from your address.
This article covers the two normal ways to set one up: through Mailgun, or by connecting your own mailbox with a password. Microsoft 365 mailboxes have their own article.
Before you start
- You need the Bots permission (
bots.manage). - Decide which address customers will write to, for example
support@yourcompany.com. - For Mailgun: your Mailgun account must be set up, and your API key stored in your vault. You never paste the raw key into BotableX.
- For your own mailbox: you need the IMAP and SMTP settings and a password or app password.
Important. An Email Channel with an active Bot Attachment sends real email to real people. Never connect a personal mailbox, not even for a quick test. Use a mailbox made for support.
So how do you create an Email Channel?
- In the menu on the left, open Bot Management, click Bots, and make sure the Channels tab is selected.
- Click + New Channel.
- In Channel Type, choose Email. A green note appears: Identity mode: Email (fixed). Email customers are always known by their email address; you cannot change that.
- Under Who sends the reply, choose how replies leave. This is the most important choice on the form, so read the section below before you pick.
- In Email Provider, choose Mailgun or My own mailbox (IMAP + SMTP - no provider account).
- In Inbound Email Address, type the address customers write to.
- In From Address (optional), type the address replies should come from. Leave it blank to use the inbound address.
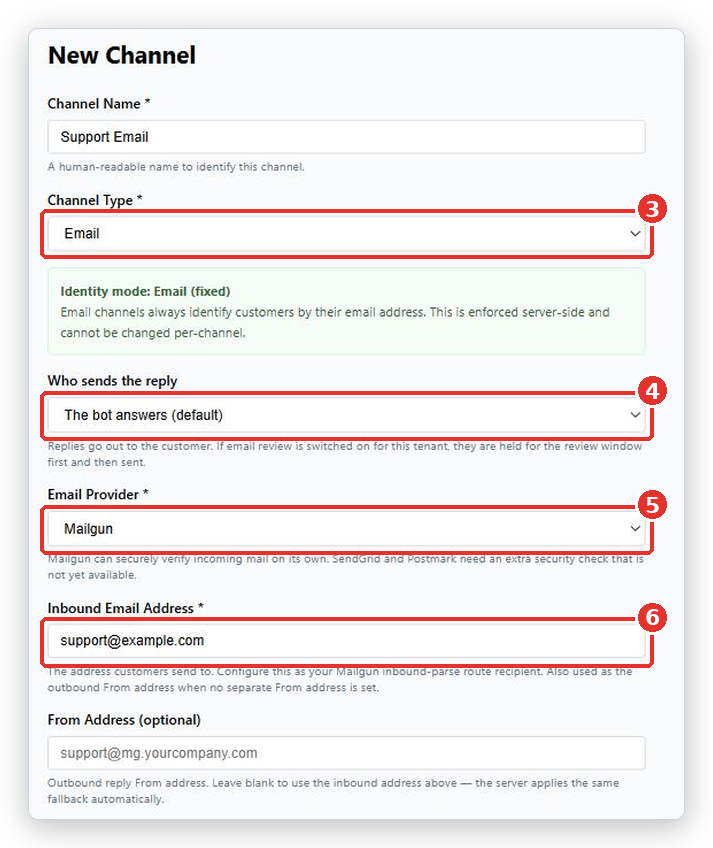
- Fill in the provider details. They are different for Mailgun and for your own mailbox; both are described below.
- Leave Deferral Overrides blank. They only matter for very busy mailboxes and the defaults are fine.
- Click Create Channel.
Who sends the reply
There are exactly two choices, and they are very different.
| Choice | What happens |
|---|---|
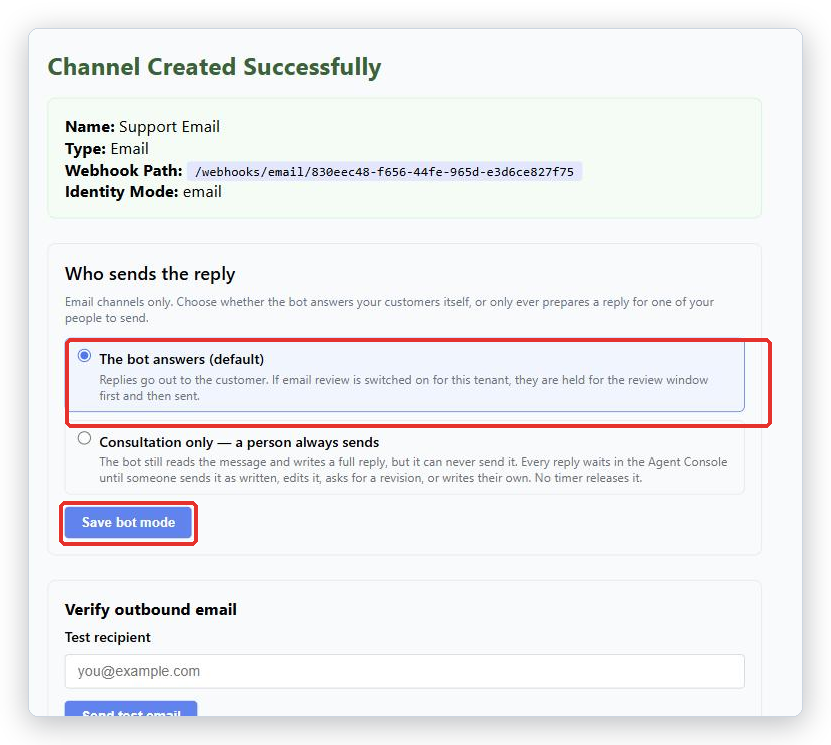
| The bot answers (default) | Replies go out to the customer. If email review is switched on for your account, they are held for a review window first and then sent. |
| Consultation only - a person always sends | The bot still reads the message and writes a full reply, but it can never send it. Every reply waits in the Agent Console until someone sends it as written, edits it, asks for a revision, or writes their own. No timer releases it. |
Pick Consultation only when you want a person to see every email before it leaves. The cost is that a queue nobody watches means a customer nobody answered.
You can change this later on the Channel page, in the Who sends the reply card. Press Save bot mode after changing it.
If you chose Mailgun
- Set up your inbound-parse route in Mailgun so mail to your Inbound Email Address is delivered to BotableX.
- In Provider API Key / Webhook Signing Key (Vault Reference), type the vault path, not the key itself. For example
vault://secrets/mailgun-api-key.
Mailgun is the recommended provider because it can verify incoming mail on its own. SendGrid and Postmark appear in the list but are marked not yet available. Mock (dev / credential-free E2E) is for BotableX testing; it sends nothing anywhere.
If you chose your own mailbox
Two extra cards appear under Connection method. Fill them in like this.
- Under Connection method, leave Password + relay selected. This works with Gmail, Zoho, cPanel, or an SMTP relay.
- In the Outbound email (your own mailbox) card, fill in SMTP host, SMTP port (usually
587), SMTP username and SMTP password. Leave Use SSL ticked. - In the Inbound mailbox (your own mailbox) card, fill in IMAP host, IMAP port (usually
993), IMAP username, leave Sign-in method on Password / app password, fill in IMAP password, and leave Mailbox folder asINBOX.
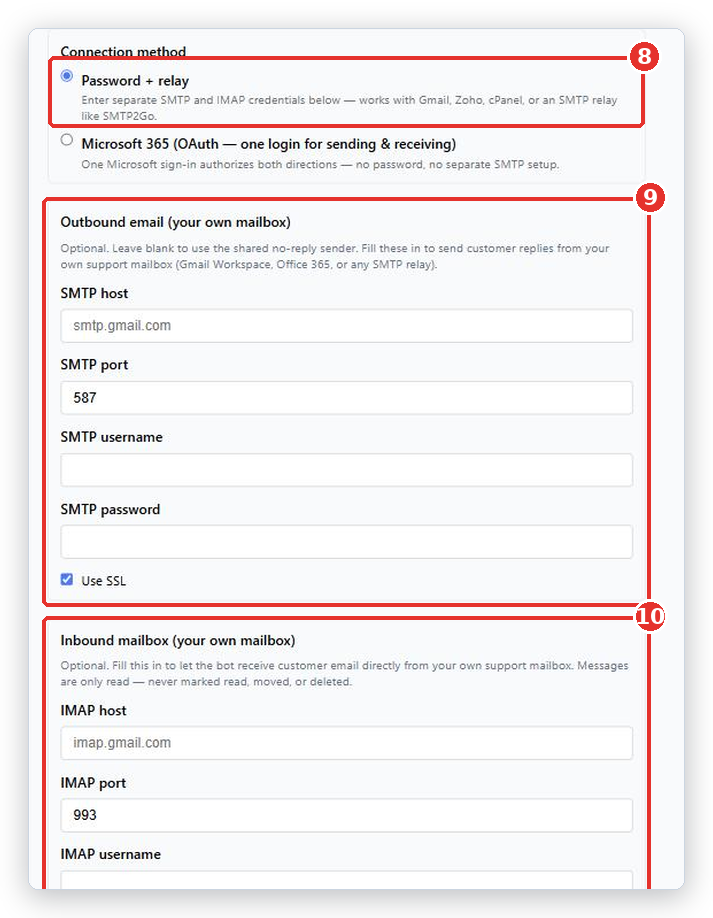
For Gmail you must use a Google app password, not your normal account password. The usual settings are imap.gmail.com on port 993 and smtp.gmail.com on port 587.
BotableX only reads your mailbox. It never marks messages as read, moves them, or deletes them, so a person can keep using the same mailbox.
What happens next
You land on the Channel page, headed Channel Created Successfully. Use Verify outbound email there: type your own address under Test recipient and click Send test email. If it arrives, sending works.
Then create an Agent and a Bot Attachment for this Channel. Send a test message from an address you control and watch what comes back. Check the Agent Console too, because your reply may be waiting there for approval.
Common problems
| Problem | What to do |
|---|---|
| SMTP username and password are required when a host is set. | You filled in SMTP host but not the login. Fill both, or clear the host to use the shared sender. |
| IMAP username and password are required when a host is set. | Same thing on the inbound side. Fill both, or clear the host. |
| Connection failed. | Check the host and port, check the password is an app password where one is needed, and check your mail provider allows this kind of sign-in. |
| Sending fails on a Microsoft 365 mailbox | Microsoft turns off password sign-in for sending by default. Use the Microsoft 365 article instead, which connects a different way. |
| Customers get an answer but nobody reviewed it | The Channel is set to The bot answers (default) and your review window expired. See the article on reviewing email replies. |
| No email arrives at all | Check the Channel is enabled and has an active Bot Attachment, and that the mailbox details are right. For your own mailbox, check the IMAP login still works. |
Status shows Pending in the Channels list |
Normal for a new Email Channel until the first message has been handled. It is not an error on its own. |
Tip from the BotableX team. Start with Consultation only - a person always sends for the first week. Your team reads every reply the bot writes and gets a feel for it. Switch to The bot answers when you trust it, not before.